
Experiment 3.1. How to create your own air quality station: Luftdaten & Enviro+ (Part1)
- Ecological

- Feb 18, 2022
- 6 min read
Updated: Feb 9, 2023

Introduction
Ok, so I really wanted to complete a different project, but due to the fact that I can't figure out the solenoid valve (and it's possible that I initially connected it incorrectly), I cannot share the main project (Project 1.1). So this is basically the absolute basic tutorial that can help anyone with no engineering knowledge at all, to get started today.
Some of the tutorials online are written in fluent nerdspeak, as if we all grew up with PCs in the 80s and have the privilege of knowing the inner workings of these devices. As much as I wish I had an older brother who could've helped me learn how to take a PC apart and rebuild it, I didn't. The first time I opened terminal I was +-34 years old. So yeah, this stuff was ridiculously complicated when I started. Especially as most tutorials are written based on a lot of assumed foundational knowledge being in place. Which was why I had to stop my original project, learn online then opt for an easier project, to try figure out what half of the jargon actually meant. So, this is plan C (Project 3.1)-- based on the components I could gain access to during the pandemic component shortage.
Plan: 2 Part plan (hardware and software) - this article just covers hardware.. not sure if my software plan is correct at this point in time. - But will know after I test it

The blue section (software plan) is based on original plan 1.1. However that was related to a different hardware plan. Will have to put it all together before I know if 1.1 software plan (blue) works with 3.1 hardware plan (green).
Inventory (hardware components)
I'll add costing when I get a gap---but this is the cheaper project compared to project 1.
These items you'll need to order online
Raspberry pi4 (pi zero what the original article recommended, however I had a pi4 which is what I've used in this project) pi3 is also suitable.
Micro SD Card - Raspbian OS
PMS5003 particulate matter sensor + cable
I suggest you buy these items by local pc shops in your area, especially small cellphone shops. You'll be able to get these at a much cheaper rate than buying from bigger retail shops or online stores
Keyboard
Mouse
Monitor
PC monitor connector cable (that funny blue cable with knobs that tighten as if you're changing volume on old radio)
2 point plug
Double adapter
Extension cord (incase you need to connect near a window and can't reach plug points)
Card reader (for your SD card to be inserted into laptop)
Other parts for this project, which I don't have yet (so I can't tell you yet where you'll find them at the cheapest rate)
M2.5 10mm metal stand offs (2 will work, ideal is 4)
3M Command strips (medium)
Gutter downpipe - 2x peices of square 112-degree, offset bend (65mm diameter)
Duct tape
Cable ties (30cm)
Mini HDMI and micro-USB adapters or micro-USB three-port hub
Other
You'll also need electricity
Wifi
For all the steps below: Do not connect to electricity until everything has been connected.
Connect Raspberry Pi4 to monitor, usb mouse, keyboard
Connect HDMI cable to monitor
Connect keyboard to pi
Connect usb mouse to pi
Connect pi powersource plug to the pi, and connect that plug to the 2 point plug (do not plug into the wall socket yet)


Connect the particulate matter sensor (PMS5003)
Connect cable from particulate matter sensor to enviro plus, look carefully at the cable, there is only one way you can insert it.

Connect Enviro+ to Raspberry Pi4
Align the enviro plus on top of the raspberry pi pins.. as displayed in image below

SD Card
Insert SD card at the bottom of your pi. This is just a 16GB SD card that I took out of my phone

Set up your micro-SD card (if not already set up)
Download Raspberry Pi Imager: https://www.raspberrypi.com/software/
You'll find options for mac and pc, in this instance, I've used the pc version
This process is basically how to flash your SD card with Raspberry Pi OS.. Basically its putting the pi software onto your SD card, so that your Pi can actually work. Think of it as installing windows on your pc or installing your mac os to a macbook computer.

Steps:
Insert SD Card into laptop usb port (or hub if you own a dumb macbook that only has one silly usbc port and will force people to buy a usb hub just to do basic stuff like this)
Download raspberry pi imager https://www.raspberrypi.com/software/
When the imager opens, it will display 2 buttons in the window, Choose OS and Choose storage.
In the "Choose OS" Select: (Raspberry Pi OS 32-BIT)
"Choose storage" : select your SD card that you've just inserted into your computer
Click on "Write" - this will start flash process
You will need to include your computers admin password to authorise this process
Once this process is completed you can safely eject your SD card from your laptop and insert it back into your Pi
Follow this guide for Setting up your pi if my instructions aren't clear: https://projects.raspberrypi.org/en/projects/raspberry-pi-setting-up/3
Connect to electricity
Now that everything is connected, it is safe to connect to electrical source -- plug into wall socket
Boot up system and connect to wifi
Follow the instructions on screen.. you'll need to change your password, connect to your wifi network and update software


Look on your top menu bar, and find the grey icon with white code ... this is your terminal:

In terminal complete the following steps (black and orange commands)
Update pi
In terminal type in:
sudo apt-get update
Go to top menu and
Install Enviro+ software
In terminal type in:
git clone https://github.com/pimoroni/enviroplus-python
cd enviroplus-python sudo ./install.sh
once this completes, then type in:
sudo pip install smbus2
once this completes, then type in:
sudo reboot
We need to reboot for the changes to take effect
Test script: Luftdaten
cd enviroplus-python/examples python luftdaten.py *
If it worked, there should be a serial number being displayed on the small enviro LCD monitor (save this number.. we'll get back to it in a bit)
Register with Luftdaten (device set up)

I had some issues with mine, as the serial number initially wasn't showing up--as I thought that once I added my initial sensor, I had issues editing the serial number, as I had used the serial number on the actual particulate matter sensor.. And was unable to edit it.
As you can see below, my LCD display was showing fuzz... so I couldn't see the serial number, and opted to use the serial number on the actual particulate matter sensor. (don't do this, as the number to input during registration has to be the code shown on the LCD of your sensor not the number on the physical barcode sticker on the sensor.
Later (after registration) tested the Luftdaten examples (eg. hello world example), I managed to get it to work.


However, if you end up in a similar situation with a fuzzy lcd screen, you just need to delete the sensor you originally added, and update with the correct one.. Make sure you use the serial number as displayed on the enviro LCD screen (remember if you set this up correctly, the connection between Luftdaten and your sensor will show that you are connected.
You can add that your sensor is indoor, until you manage to add your outdoor version

When entering your personal data, do what you feel comfortable with. I didn't feel it was right to publish my exact location. So I only added the nearby street in my area instead of posting my exact address details. See below to see sensor type settings used

Automatically run luftdaten script
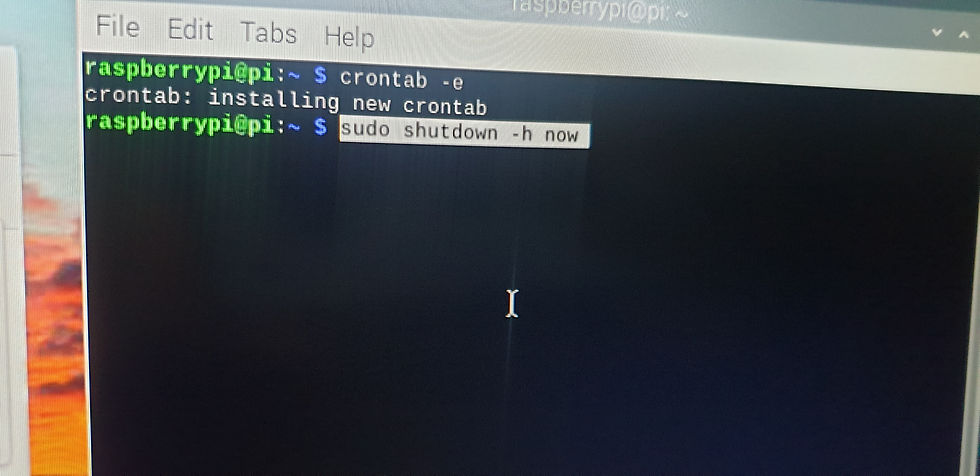
In the terminal, type
crontab -e
and then select nano as the editor.

Scroll down all the way to the end of file--(just use your down arrow keys to do so)
then type the following line:
@reboot sudo python /home/pi/enviroplus-python/examples/luftdaten.py &
Press
control-x
then
y

then
enter
to exit and save the new crontab.
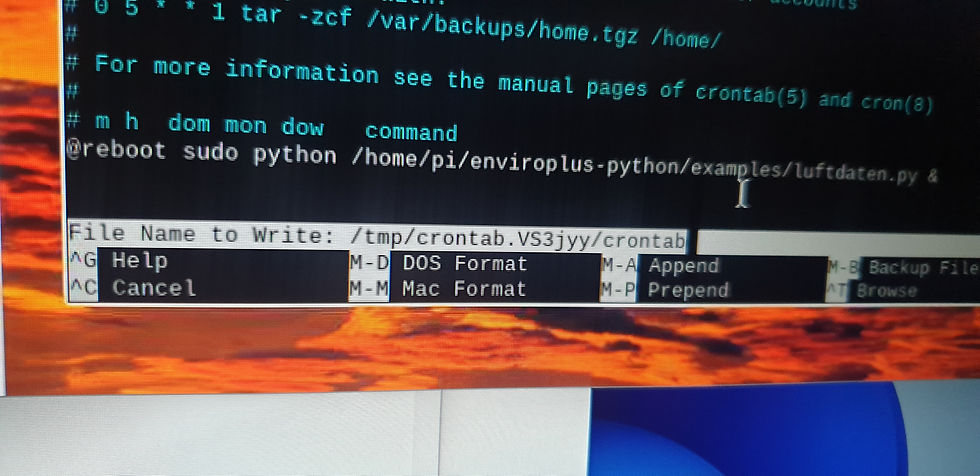
then reboot:
sudo shutdown -h now
If you set up everything correctly, you luftdaten script should automatically run when you switch your pi back on.
If you want to stop running the examples
Press
Ctrl+C
Contributing to the community
Now take a moment to see your little sensor, on the map ;)

If you're unable to see sensor in Florida Roodepoort Johannesburg, then it's probably loadshedding
If you are successfully sharing data with the sensor community your sensor should display data on their website like this:


If you need to update your pi
Type in this code in terminal:
sudo apt update

If you need to switch off your pi
Type in this code in terminal:
sudo shutdown -h now
Usage: Outdoors
In progress
Dashboard
In progress
Connect remotely to your Pi
*Possible issues for script not running
Python> Python3
if you have issues with this process not working.. namely Luftdaten script not running, change input from "python luftdaten.py" to "python3 luftdaten.py" -- (info updated 09 February 2023)
Change advanced settings "interfaces" in
type:
sudo raspi-config
this will bring up the config screen, use arrow keys to select interfaces and enable serial port and serial console. (if you're unable to connect via vnc and ssh, this is also where you can enable these settings if you previously hadn't done so)


Comments